Dragon*Con update/ Ghostbusters 1/ Shape of things to come.

Posted by Andy | | Posted On Wednesday, August 4, 2010 at 6:21 AM

Hey guys.

So it's been a while since we updated the page, and for good reason. Last we spoke, we talked about the helmet and molding. Well it turns out that didn't work out. We didn't have enough molding supplies (namely latex) to totally cover the project, but we thought we'd push it. So by pushing it, we're back at square one.

On an unrelated note, Inception is an incredible movie.

Now to make that unrelated note, related, after I watched Inception I had this incredibly lucid dream in which we went to Dragon*Con and everybody was impressed with our Ghostbusters costumes. Ghostbusters. An idea that has been tossed around by Jimmy and I, but never followed through. It was time to begin.


Ghostbusters is a cult hit with an all star cast. Our plan was to attempt to be as cool.

The outfits are incredibly detailed, and made from a lot of parts that were ok in the 80's but not available now. I like a challenge.

Our plans were to have two full costumes, goggles, proton packs, a trap, and a PKE meter.

First we started with the Ecto goggles (I have to type kind of quick because I only have a few minutes before work. The goggles let the 'Busters see invisible clues.

Ours were built off a modified pair of welding goggles. Modified for your enjoyment by Brown and Decker.


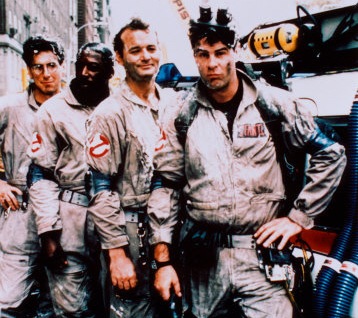
Next we started on the pack. Here's a picture of what we're aiming for.


and here's us.


It doesn't look like much yet, but the motherboard is made out of Masonite (the stuff clipboards are made out of) and the parts are insulation foam, meticulously cut by hand. The next step is Gesso (for great justice) and mounting.

Also, last thing before I go, we got the tickets for the paranormal investigations class at the *Con. We were the last few slots. AND, we did make it to the Army surplus store for supplies. A final picture then I really have to go (I'm going to be late).


Brown & Decker industries would like to take this time to remind you that bustin' makes us feel good.

Andy

Daft Punk V2

Posted by Jimmy | Labels: , , , , | Posted On Saturday, July 3, 2010 at 7:36 AM

Alright, it's been a while since our last update. Vacation's over now, so it's time to jump back to work. Having only two months until Dragon*Con, Andy and I are working diligently on completing our Daft Punk costumes.

Yesterday, we decided to try some new methods for getting the shape of the Guy-Manuel helmet.
That is a small Brush-On Molding Kit and ApoxieSculpt. Not shown in this picture are several cans of rigid expanding foam. The plan is to make a mold of a helmet, fill it with expanding foam, then shave away until we get the shape that we want. Once there, we coat it with the ApoxieSculpt to give it a hard shell which can be bondo'd and sanded.

The first step was to seal the gaps in the helmet we decided to use. This includes spaces between the visor or air vents.
Next we mixed the two-part plastic mold together. Yesterday was a scorcher, as can be seen in the sweat-filled latex gloves.
The first layer is dabbed on thin to pick up detail.
After 30-40 minutes the first layer was ready, and we began the second. It has the same consistency as the first, but is brushed on with fluid strokes.
Once that layer was ready, we added a cut-seam along the back. This will be cut later on to remove the original helmet from the mold.
Our third and final layer. This was a thick layer of plastic, with added hardener. The starter kit may have been a bit small for what we needed it for, but it looks like it turned out okay.

Next time, we'll be building the outer shell. Also, we were thinking of using this mold to make some power ranger helmets. Stay tuned!

-Jimmy

Soul Edge Day 2

Posted by Andy | | Posted On Wednesday, May 19, 2010 at 2:41 PM

Hey guys,

So day two has come and gone, and I can honestly say it was pretty successful. All that was done today was some more basic shaping and carving of the Soul Edge. Now, I was a little nervous about this project when I started. Jimmy and I had never worked with expanding foam in shaping, just for...you know, what it's supposed to do. Well, let me tell you this much, it saves a ton of time. I'm not how I would've done this project any other way.

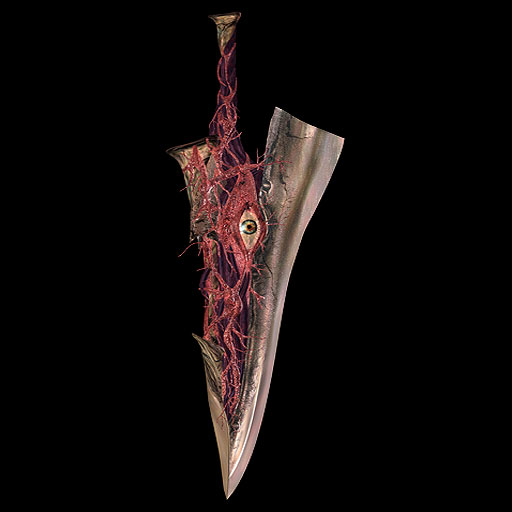
If you're just tuning in, last I wrote about how Jimmy is up visiting his friends in the north, and I'm working solo for the next month. My two main projects are the F.L.U.D.D. from Mario Sunshine and the Soul Edge from the Soul Edge and Soul Calibur series (if you're a fan of the series, it's modeled after Soul Calibur 2's Soul Edge. I chose this one because I felt it was instantly recognizable.

)

So anyway, the course of action was to build the skeleton, cover it in foam, and carve it down to size. Here's where we stand today. I have one side almost completely finished, where as the other side...hit a little snag. Seems like there was a little pocket of air that got sealed in the center of one of the sides, leaving not only a huge cave of unset foam, but also a major structural weak point. So consider it halfway done on carving. The next step is to fill the hole and keep on keepin on. Only thing is I'm running out of daylight and it's hot outside. Saving it all for tomorrow.

Oh, almost forgot, here's some pictures.


Now, the idea was to keep it as true to the game as possible. Only issue with that is the one in the game is modeled to be around 8 to 10 feet tall. When you live in a small apartment, it's hard to get a prop like that around. What's even worse is if you have a workshop in the next town over, you have to pack that thing in your car, and if you're like me and drive a small car, a big prop doesn't exactly fit in. Anyway, long story short, here's a picture with me next to it to give you an idea of how tall it is. I give it around six feet.


Andy

Solo Projects

Posted by Andy | | Posted On Tuesday, May 18, 2010 at 4:05 PM

Hey guys,

Jimmy's going to be up in Michigan until almost the end of June, so it'll be just me for a while.

So, since it's just me, I started working on some projects I've been holding out on. The first is the F.L.U.D.D. from Super Mario Sunshine.


Cool little backpack styled device used for just the one Mario game. One of my favorites.

I've wanted to make this build for some time, but never really gave it much thought until I saw these guys do it, and it inspired me. It's going a little slow because I'm working on my own, but here's about a day's worth of work.


Haven't been keeping up with the developmental pictures as much as I should, but as of today, I have the head completely finished and painted, and the skeleton and body ready. Just a little bit more on that.

The other project I'm starting is the Soul Edge from the Soul Calibur series. Very cool game and my favorite fighting series. The Soul Edge is a blade that houses the soul of Inferno, a being of pure evil. DUN DUN DUUUUN.


It's a big prop. And by big I mean ten-feet-long big. For real.

The idea was adapted from a method used by Kamui Cosplay, who is an INCREDIBLE costumer, but that's for later.

So the plan is to build the skeleton of the sword by drawing out the general shape on thick foam board and piling on a TON of expanding foam.


After a couple hours (and a couple cans of foam) it starts to take shape.


The next step is the start carving it in to shape, but that's for another day. More updates will follow.

Andy

Arc Reactor Update 3 / Iron Man 2 Review

Posted by Jimmy | | Posted On Friday, May 7, 2010 at 3:06 PM

HEY! So big news! I'm pretty proud to say that Brown & Decker, once just a crazy dream, is starting to become a reality! There are actually REAL PEOPLE reading our blog right now! AMAZING!

For those who didn't know, yesterday was a pretty big day for me. Firstly, it was my 20th birthday - and I had a blast! Second, May 6/7th was the premier of Iron Man 2! More important than that, though, was our first public excursion with the arc reactors! We got a lot of attention at the theater, seeing as how we were the ONLY ones to do anything apart from wearing an Iron Man t-shirt. We brought a few to sell, and sell we did! Though we didn't have any business cards to hand out, we did manage to spread the word about this blog! (special shout-out to those two guys who parked next to us! WHOO!!)

That puts the Official Arc-Reactor inventory at only TWO LEFT! We're going to take a break from making any more while I'm on vacation for the next month, so send a message before your chance is GONE! Thanks to everyone who bought/reserved one!

Also, I thought it'd be fun to do a little review of the movie, so here it is...


Iron Man 2 Review
WARNING: Though I'll be keeping this relatively spoiler free, you may not want to read any further if you've yet to see this movie!

For those of you who are worried about this movie, I say to you: don't be! Though Iron Man 2 may not be the glorious beacon of perfection that the first movie was, but it doesn't disappoint. Mostly.

One thing I heard my friends saying before we saw the movie is that they'd heard it went a little "Spider-man 3" with too many villains. I say that's a little harsh. Granted, Iron Man 2 has Tony Stark showing off not one, not two, but THREE new suits of armor, not to mention War Machine, Justin Hammer, and Whiplash/Crimson Dynamo. But I felt that they all got equal treatment in this film. There certainly wasn't the raping of beloved characters (i.e.- Venom) in Iron Man 2. I felt the large cast of characters was somewhat essential, as any one of them by themselves wouldn't have made for much of a movie.

Next up, Rhodey. Now it may just be me, but I liked Don Cheadle's Rhodey better than Terrance Howard's. But, then again, I really don't like Terrance Howard as an actor. I've seen him in a couple other movies, and I've not really been impressed. But Don Cheadle was fun to watch. I felt he was more of a fit for the tough War Machine character. But either way, by the time this movie hits the half-way point, you will forget that you were worried about the change in actors.

On that same note, War Machine! DAMN! WOW! The climactic fight scene at the end is what made this movie for me. You've gotta see it!

On a somewhat cynical note, I was not impressed by some of the special effects in this movie. For those of you who've seen Wolverine Origins, think back to the scene when he first gets his adamantium claws. That whole scene looked cartoony to me, and at times, the Iron Man armor feels the same. But that was one scene out the entire movie, and the rest of the time, it looks GREAT!

Next up is Mickey Rourke's, um... Whiplash? Crimson Dynamo? You'll be confused, too, but it's not a bad thing. The movie takes what was otherwise a pretty unremarkable villain - whiplash - and makes him... well, badass! Without ruining too much, I'll say that you shouldn't be worried that he won't fill the rolls of both villains.

Too wrap it up, I would say that, again, it's not as good as the first, but certainly one of the best super-hero movies to ever be produced, and a hell of a fun movie to watch. If the first Iron Man is a 10/10, than Iron Man 2 gets an 8.5/10 from me!

-Jimmy

Arc Reactors Update 2

Posted by Andy | | Posted On Monday, May 3, 2010 at 9:41 PM

Hey all.

Man, what a long night. We spent quite some time making some more Arc Reactors. My fingers are all cut up. We made about seven, and if anyone's interested, we'll do a deal before the premier. Out of the seven, a few are already claimed.

1.) Jacqueline (Marvel Girl)
2.) Ben
3.) Graham
4.)
5.)
6.)
7.)

Anyway, here's some more pictures.


Andy

Arc Reactor Follow-up

Posted by Jimmy | | Posted On Saturday, May 1, 2010 at 10:43 AM

Tony Stark was able to build this in a cave! With a box of scraps!
And now, so have we!

Alright, guys. This one took a lot of planning and hard work, but we were able to complete three arc reactors (not quite wearable, yet) in just over four hours.

Here's the arc reactor that appeared in the movie:

The level of detail on this prop is astounding. And when people try to recreate this, they end up with one of two possible outcomes. 1) Movie accurate prop - looks good as a display, but not so great when worn, or 2) Wearable prop - looks good worn under a shirt, but bears little resemblance to the movie prop.

Our primary goal was a prop that looked good when worn, as these will be making their debut at the Iron Man 2 midnight premier next week. But we also wanted it to come close to the movie prop, too. Take a look at the results and decide for yourself:


I felt that we got something that people will see and instantly recognize what its supposed to be. We did a great deal of research before this project, reading several instructions that others had posted around the internet. Again, they were either good looking props or wearable props. I felt that, out of all the arc-reactor builds I've seen on the internet, our Arc Reactor is easily in the top 50% on looks. Optimistically, the top 25%. It looks great when worn, but also looks pretty cool as a display.

I think we will definitely be coming back to this project and cranking out some higher-quality ones as we refine our process. Right now, the parts cost $20+ per unit, plus four-odd hours of labor.

I'll wrap this up with a few videos of the build process. Enjoy the Forging of the Arc Reactor!

-Jimmy